안드로이드 마스크 앱 만들기 (4) - 네이버 지도에 표시하기 (완결)
이 시리즈는 간단한 기능 구현에 대한 글이며
Kotlin을 통해 개발하였고 결과물은 구글 플레이스토어에 등록하였다.
다운 받으러 가기
관련 글 보러가기
안드로이드 마스크 앱 만들기 (1) - 공적 마스크 api와 네이버 지도 api
안드로이드 마스크 앱 만들기 (2) - GPS로 현 위치 좌표 알아내기
안드로이드 마스크 앱 만들기 (3) - 공적 마스크 api 사용하기
안드로이드 마스크 앱 만들기 (4) - 네이버 지도에 표시하기 (완결)
코드 다운
https://github.com/Junhwan26/MaskApp
Junhwan26/MaskApp
Contribute to Junhwan26/MaskApp development by creating an account on GitHub.
github.com
저번 글에서 공적 마스크 api를 통해 얻어온 데이터들을 MapActivity에 넘겨주는 것까지 해보았다. 이제 MapActivity를 만들어 지도 위에 마커로 표시하는 작업을 해볼 것이다. 자세한 내용은 네이버 지도 api for android 이 문서를 참고하면 된다.
시작하기에 앞서 api를 사용할 수 있도록 의존성을 추가해야 한다. 네이버 지도 SDK는 Bintray를 통해 배포된다. 루트 프로젝트의 build.gradle에 저장소 설정을 추가한다.
allprojects {
    repositories {
        google()
        jcenter()

        // 네이버 지도 저장소
        maven {
            url 'https://navercorp.bintray.com/maps'
        }
    }
}
그리고 앱 모듈의 build.gradle에 네이버 지도 SDK에 대한 의존성을 선언해야 한다.
dependencies {
    // 네이버 지도 SDK
    implementation 'com.naver.maps:map-sdk:3.7.1'
}
이제 준비과정은 모두 끝났다. 본격적으로 네이버 지도를 사용해보자. 네이버 지도를 사용하기 위해 OnMapReadyCallback을 상속받는다. OnMapReadyCallback을 상속 받으면 비동기로 NaverMap 객체를 얻을 수 있다. NaverMap 객체가 준비되면 onMapReady() 콜백 메서드가 호출된다. onMapReady()에서 작업을 해주면 된다.
"MapActivity"

class MapActivity : AppCompatActivity(), OnMapReadyCallback {

    var array : ArrayList<Pharmacy>?=null
    private lateinit var locationSource: FusedLocationSource
    var latitude:Double?=null
    var longitude:Double?=null

    companion object {
        private const val LOCATION_PERMISSION_REQUEST_CODE = 1000
    }

    override fun onCreate(savedInstanceState: Bundle?) {

    }

    override fun onMapReady(naverMap: NaverMap) {

    }
}
onCreate()에서 MainActivity에서 넘겨준 위도, 경도, 마스크 재고 데이터를 받아준다. 네이버에서 지도를 화면에 띄우는 방법으로 MapFragment를 가장 권장하고 있기 때문에 MapFragment를 사용한다.
"MapActivity"

    override fun onCreate(savedInstanceState: Bundle?) {
        super.onCreate(savedInstanceState)
        setContentView(R.layout.activity_map)


        locationSource =
            FusedLocationSource(this, LOCATION_PERMISSION_REQUEST_CODE)

        val intent = intent
        array =intent.getParcelableArrayListExtra<Pharmacy>("list")
        latitude = intent.getDoubleExtra("latitude",0.0)
        longitude = intent.getDoubleExtra("longitude",0.0)

        NaverMapSdk.getInstance(this).client = NaverMapSdk.NaverCloudPlatformClient("Your Cient ID")

        val fm = supportFragmentManager
        val mapFragment = fm.findFragmentById(R.id.map_fragment) as MapFragment?
            ?: MapFragment.newInstance().also {
                fm.beginTransaction().add(R.id.map_fragment, it).commit()
            }

        mapFragment.getMapAsync(this)

    }
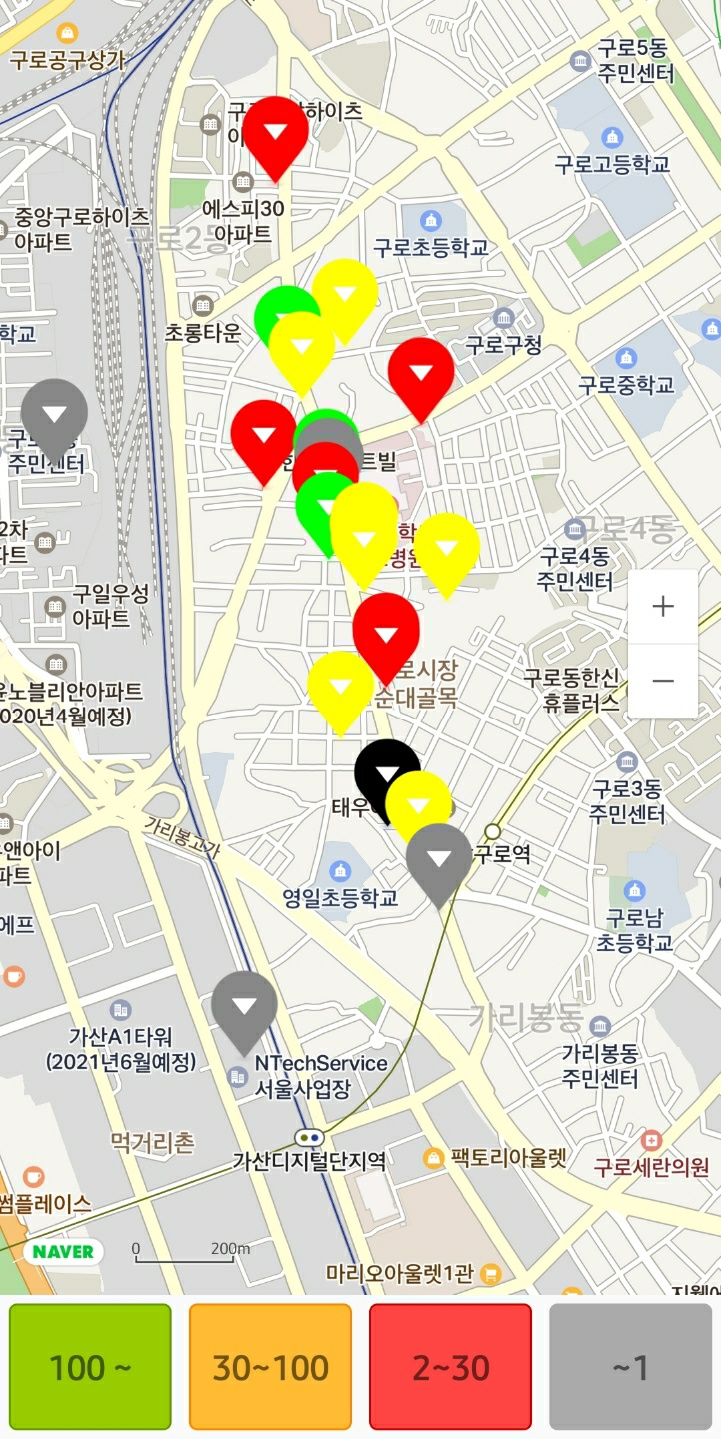
맵에 마스크 판매처의 위치를 표시하기 위해서 Marker를 사용할 것이다. 또한 Marker를 클릭하였을 때 판매처에 대한 상세 정보는 InfoWindow를 이용한다. 각 판매처에 대한 Marker의 태그에 상세 정보를 입력해준다.
가끔가다 정보가 아예 없는 판매처도 있기 때문에 remain_stat 값이 "null"인 경우는 정보없음을 띄워준다.
마스크 재고량에 따라 Marker의 색상을 설정해주고 판매처 이름 (유형) \n입고시간 : $입고시간을 각 태그에 넣어준 뒤 setOnClickListener를 설정하여 Marker가 클릭 되었을 때 상세정보가 나타나게 해준다.
네이버 예제에서는 비동기로 처리하여 각각의 마커를 mutableListOf<Marker>에 넣어줬지만 1km이내의 판매처의 수가 별로 많지 않기 때문에 따로 비동기 처리를 해주지 않았다.
"MapActivity"

    override fun onMapReady(naverMap: NaverMap) {

        val cameraUpdate = CameraUpdate.scrollTo(LatLng(latitude!!, longitude!!)).animate(CameraAnimation.Fly)
        naverMap.moveCamera(cameraUpdate)

        val infoWindow = InfoWindow()
        infoWindow.adapter = object : InfoWindow.DefaultTextAdapter(this) {
            override fun getText(infoWindow: InfoWindow): CharSequence {
                // 정보 창이 열린 마커의 tag를 텍스트로 노출하도록 반환
                return infoWindow.marker?.tag as CharSequence? ?: ""
            }
        }

        val markers = mutableListOf<Marker>()
        array!!.forEach {
            markers+=Marker().apply {

                position=LatLng(it.latitude,it.longitude)
                icon = MarkerIcons.BLACK
                if(it.remain_stat=="plenty")
                    iconTintColor= Color.GREEN
                if(it.remain_stat=="some")
                    iconTintColor=Color.YELLOW
                if(it.remain_stat=="few")
                    iconTintColor=Color.RED
                if(it.remain_stat=="empty")
                    iconTintColor= Color.GRAY
                width=Marker.SIZE_AUTO
                height=Marker.SIZE_AUTO

                var tmp : String?=null
                if(it.type=="01")
                    tmp="약국"
                if(it.type=="02")
                    tmp="우체국"
                if(it.type=="03")
                    tmp="농협"

                if(it.remain_stat == "null")
                    tag=it.name+" ($tmp)"+"\n정보 없음"
                else
                    tag=it.name+" ($tmp)"+"\n입고 시간 : "+it.stock_at

                setOnClickListener {
                    infoWindow.open(this)
                    true
                }
            }
        }

        markers.forEach { marker ->
            marker.map = naverMap
        }


    }
레이아웃 구성은 아래와 같이 해주었다.
"activity_map.xml"

<?xml version="1.0" encoding="utf-8"?>
<androidx.constraintlayout.widget.ConstraintLayout xmlns:android="http://schemas.android.com/apk/res/android"
    xmlns:app="http://schemas.android.com/apk/res-auto"
    xmlns:tools="http://schemas.android.com/tools"
    android:layout_width="match_parent"
    android:layout_height="match_parent"
    tools:context=".MapActivity">

    <LinearLayout
        android:layout_width="match_parent"
        android:layout_height="match_parent"
        android:weightSum="10"
        android:orientation="vertical">

        <fragment
            android:id="@+id/map_fragment"
            android:layout_width="match_parent"
            android:layout_height="match_parent"
            android:name="com.naver.maps.map.MapFragment"
            android:layout_weight="1" />

        <LinearLayout
            android:layout_width="match_parent"
            android:layout_height="match_parent"
            android:layout_weight="9"
            android:weightSum="4">

            <TextView
                android:layout_width="match_parent"
                android:layout_height="match_parent"
                android:layout_margin="5dp"
                android:layout_weight="1"
                android:text="100 ~"
                android:textSize="20dp"
                android:textStyle="bold"
                android:gravity="center"
                android:background="@drawable/btn_green">

            </TextView>

            <TextView
                android:layout_width="match_parent"
                android:layout_margin="5dp"
                android:layout_height="match_parent"
                android:layout_weight="1"
                android:text="30~100"
                android:textSize="20dp"
                android:textStyle="bold"
                android:gravity="center"
                android:background="@drawable/btn_orange">

            </TextView>

            <TextView
                android:layout_width="match_parent"
                android:layout_height="match_parent"
                android:layout_margin="5dp"
                android:layout_weight="1"
                android:background="@drawable/btn_red"
                android:paddingTop="5dp"
                android:paddingBottom="5dp"
                android:text="2~30"
                android:textSize="20dp"
                android:textStyle="bold"
                android:gravity="center">

            </TextView>

            <TextView
                android:layout_width="match_parent"
                android:layout_height="match_parent"
                android:layout_margin="5dp"
                android:layout_weight="1"
                android:background="@drawable/btn_gray"
                android:text="~1"
                android:textSize="20dp"
                android:textStyle="bold"
                android:gravity="center">

            </TextView>

        </LinearLayout>

    </LinearLayout>

</androidx.constraintlayout.widget.ConstraintLayout>'Android Studio > 우리 동네 마스크' 카테고리의 다른 글
| 안드로이드 마스크 앱 만들기 (3) - 공적 마스크 api 사용하기 (11) | 2020.03.15 |
|---|---|
| 안드로이드 마스크 앱 만들기 (2) - GPS로 현 위치 좌표 알아내기 (0) | 2020.03.13 |
| 안드로이드 마스크 앱 만들기 (1) - 공적 마스크 api와 네이버 지도 api (2) | 2020.03.12 |